|
=----------------------=
=- Table of Contents: -=
=----------------------=
|
I.
|
Introduction & Copyright
|
[inc]
|
|
II.
|
FAQ Backlog
|
[ver]
|
|
III.
|
Match Rundown
|
[mrd]
|
|
IV.
|
Rules
|
[rls]
|
|
i.
ii.
iii.
iv.
v.
vi.
|
Level & Stats
Healing Rule
Equipment
Drive Forms
Customization
Miscellany
|
[lns]
[rhr]
[req]
[rdf]
[rcu]
[rmi]
|
|
V.
|
Goals & Battle Report
|
[aim]
|
|
i.
ii.
iii.
iv.
|
Match Oriented Goals - Reaction Attack
Boss Match Oriented Goals - Time Attack
Cup Oriented Match Goals - Cup Rules
Battle Report
|
[rat]
[tat]
[com]
[bar]
|
|
VI.
|
Recommendations
|
[rec]
|
|
i.
ii.
|
Abilities
Magic
|
[abs]
[mag]
|
|
VII.
|
Paradoxical Challenge Rundown
|
[pcr]
|
|
VIII.
|
Report Card
|
[rca]
|
|
IX.
|
Credits
|
[crd]
|
|
X.
|
Final Words
|
[fwd]
|
=-----------------------------=
=- Introduction & Copyright: -=
=-----------------------------=
Ctrl+F (F3): [inc]
This challenge came about mainly due to my competitive nature while I was completing the Hades Paradox Cup for the first time;
it was out of a desire to beat my own initial score without the use of Summons, seeing as Stitch and Peter Pan practically
make Jiminy's Journal requirements a breeze. As I pondered more about the challenge, I layered different goals and regulations,
and a "No Summon Paradox Challenge" became a full-blown "Paradoxical Challenge". At the time there were a couple of topics
going around the Kingdom Hearts II GameFAQs message board numbering different challenges, but some were either too simple
or unappealing. I felt that challenging the Paradox Cup without any auxiliary methods and just with your own skills was quite
a test - a test of strengths.
The Hades Paradox Cup by far has proven its complexity, and challenging it is the perfect way to test ones skills and resourcefulness.
In another matter, this guide was done mainly out of my free will and time, not to make profit out of it. It's content herein
is copyright (©) of its author, PsychoZeke. This document is to be used strictly and only by the public itself and cannot
be sold. This FAQ is for the sole purpose of being accessible to the web community and cannot be reproduced, retransmitted,
rewritten in any other form unless acknowledged by its author; it cannot be edited by anyone else but the author, PsychoZeke.
As any other form of literature, this is a brainchild, which is to be respected by any who has access to it.
As of now, this FAQ is only available to:
GameFAQs.com
CheatHappens.com
IUP.com
Neoseeker.com
NOTE: I think it goes without saying that this guide may contain some SPOILERS.
=----------------=
=- FAQ Backlog: -=
=----------------=
Ctrl+F (F3): [ver]
Version I - Tuesday, May 16, 2006: The birth and origin of the Paradox Cup Challenge, introduced firstly in the Kingdom
Hearts II GameFAQs message board. As part of this guide's assembly and development, I delved into the challenge to expand
possible strategies, completing it with satisfactory scores.
Version II - Saturday, May 21, 2006: I received a visit from Chibi Sari and Maxen, whom I had spoken with regarding the
challenge prior to making it official in the Kingdom Hearts II GameFAQs message board. Both took part in the challenge, completing
it after a long-winded hour with good score punctuations.
Version III - Monday, May 22, 2006: Gave a hiatus to the challenge due to finals and other in-between personal baggage.
Version IV - Thursday, June 08, 2006: After completing my Gameplay Strategies guide, began full work on the Paradox Cup
Challenge FAQ.
Version V - Friday, June 09, 2006: Rules, Recommendations, Magic and the Goals & Battle Report sections added, as
well as their respective subsections.
Version VI - Saturday, June 11, 2008: Added a section detailing the enemies in each match, aptly called Match Rundown.
Version VII - Monday, June 12, 2006: Began work in the Paradoxical Challenge Rundown section, completing the introduction
and the Goddess of Fate section.
Version VIII - Tuesday, 13-20, 2006: Added a detailed rundown of the Titan Cup and the Pain & Panic Cup. Decided to
take an "involuntary" break.
Version IX - Friday-Wednesday, 23-28, 2006: Decided to finish this guide to finally see the challenge in progress. Almost
guessed the amount of pages the guide would end up having, too - I lost...by one. Oh well... :D
=------------------=
=- Match Rundown: -=
=------------------=
Ctrl+F (F3): [mrd]
The following section contains a complete Hades Paradox Cup digest with each match and the enemies that appear in each
in full detail.
The Hades Paradox Cup encompasses all the previous tournaments you've participated in, and after exactly 10 matches, a
new rule will be prompted specifying what part of the cup you're in. These are as follows:
Goddess of Fate Cup Rules - Matches 1-10: Sora can use Limits, Summons and can also use Drive Forms while Donald and Goofy
fight alongside him.
|
Match 1
|
3 Shadows & 3 Soldiers
|
|
Match 2
|
2 Hook Bats & 4 Drill Moles
|
|
Match 3
|
2 Surveillance Robots & 4 Rapid Thrusters
|
|
Match 4
|
2 Creeper Plants & 5 Rabid Dogs
|
|
Match 5
|
(Boss) Volcanic Lord & 2 Soldiers (2)
|
|
Match 6
|
3 Cannon Guns & 3 Silver Rocks
|
|
Match 7
|
3 Icy Cubes & 4 Shadows -> 8 Minute Bombs
|
|
Match 8
|
2 Silver Rocks & 3 Soldiers -> 5 Armored Knights -> 1 Large Body
|
|
Match 9
|
1 Samurai & 4 Creepers
|
|
Match 10
|
(Boss) Tifa & Yuffie
|
Titan Cup Rules - Matches 11-20: Sora fights alone, but can use Summons to aid him in battle. The Titan Cup Rules also include
the Damage Point system where if they reach zero, the tournament ends.
|
Match 11
|
3 Aeroplanes & 5 Rapid Thrusters
|
|
Match 12
|
1 Magnum Loader, 2 Air Pirates & 4 Minute Bombs
|
|
Match 13
|
2 Drill Moles & 3 Luna Bandits
|
|
Match 14
|
2 Armored Knights, 2 Lancer Soldiers & 2 Tornado Steps
|
|
Match 15
|
(Boss) Blizzard Lord
|
|
Match 16
|
2 Wight Knights & 4 Soldiers
|
|
Match 17
|
3 Neoshadows & 4 Strafers -> 4 Aerial Knockers
|
|
Match 18
|
2 Air Pirates & 2 Luna Bandits -> 3 Creeper Plants & 3 Wight Knights
|
|
Match 19
|
1 Dragoon, 2 Creepers & 2 Dusks
|
|
Match 20
|
(Boss) Pete
|
Pain & Panic Cup Rules - Matches 21-30: Sora fights alongside Donald and Goofy, but cannot use Drive Forms; however, Limits
consume less MP than usual.
|
Match 21
|
3 Gargoyle Knights & 4 Armored Knights
|
|
Match 22
|
1 Aeroplane, 2 Fortunetellers & 2 Trick Ghosts
|
|
Match 23
|
2 Creeper Plants, 2 Shamans & 2 Soldiers
|
|
Match 24
|
3 Bulky Vendors
|
|
Match 25
|
(Boss) Cloud & Tifa
|
|
Match 26
|
1 Neoshadow, 2 Bolt Towers & Hammer Heads
|
|
Match 27
|
2 Gargoyle Warriors & 8 Rabid Dogs -> 4 Nightwalkers
|
|
Match 28
|
2 Bookmasters & 2 Emerald Blues -> 4 Shamans -> 2 Emerald Blues & 4 Silver Rocks
|
|
Match 29
|
2 Gamblers & 2 Snipers
|
|
Match 30
|
(Boss) Hades
|
Cerberus Cup Rules - Matches 31-40: Sora fights alone during this part of the tournament with his Drive Forms available for
use. As with the standard Cerberus Cups, you're introduced, and must complete the next ten matches in under a 10-minute time
limit.
|
Match 31
|
1 Berserker, 2 Creepers & 2 Samurais
|
|
Match 32
|
3 Dancers & 3 Water Notes
|
|
Match 33
|
4 Samurais
|
|
Match 34
|
2 Sorcerers
|
|
Match 35
|
Swarm of Rapid Thrusters
|
|
Match 36
|
3 Berserkers
|
|
Match 37
|
2 Snipers & 3 Assassins -> 4 Dragoons
|
|
Match 38
|
6 Dusks -> 4 Dancers -> 5 Samurais -> 4 Gamblers -> 1 Sorcerer
|
|
Match 39
|
4 Dragoons
|
|
Match 40
|
(Boss) Leon & Cloud
|
Hades Cup Rules - Matches 41-50: Sora is on his own, which means no allies, Summons, and Drives. Magic becomes the best ally
during this portion of the Hades Paradox Cup.
|
Match 41
|
2 Graveyards & 2 Toy Boxes
|
|
Match 42
|
1 Living Bone & 2 Fortunetellers
|
|
Match 43
|
2 Large Bodies & 2 Morning Stars
|
|
Match 44
|
3 Living Bones
|
|
Match 45
|
1000 Heartless Battle - Armored Knights & Surveillance Robots
|
|
Match 46
|
1 Devastator & 2 Hot Rods
|
|
Match 47
|
1 Bulky Vendor -> 1 Living Bone & 2 Lance Soldiers -> 2 Assault Riders & 2 Emerald Blues -> 3 Morning Stars
& 5 Crescendos
|
|
Match 48
|
(Boss) Cerberus
|
|
Match 49
|
(Boss) Yuffie, Cloud, Tifa, & Leon
|
|
Match 50
|
(Boss) Red Hades
|
=----------=
=- Rules: -=
=----------=
Ctrl+F (F3): [rls]
The rules are simple: survive the Hades Paradox Cup solely with the use of strength and magic. Hence, it is apt to point
out that spells and abilities can be used due to the survival aspect of the challenge; however, there are certain parameters
to follow, which consists of the following:
--------------.
Level & Stats: \_
Ctrl+F (F3): [lns]
- Any level is acceptable, but due to the magnitude of this challenge, level 99 is recommendable.
- Sora's max stats are 153 (Strength), 155 (Magic), 154 (Defense), and 166 (AP). Knowing this, aim to have Sora's stats
at 100+, though the challenge is possible to accomplish at lower stat levels.
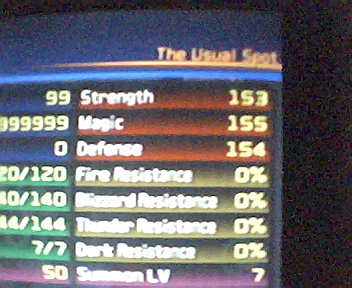
|
| Default max stats for Sora. |
-------------.
Healing Rule: \_
Ctrl+F (F3): [rhr]
- No Healing Items (NHI): No curative items can be used, meaning you'll leave them all in your inventory, including those
in your Item Slots. This rule applies to Sora, Donald, and Goofy.
NOTE: This also includes MP restorative items.
- No Healing Spells (NHS): Healing magic must be unequipped, both Sora and Donald's.
- Healing Round: During Match 47 of the Hades Paradox Cup, in the fourth enemy set you will encounter 5 Crescendos where
you can use their Reaction Command, Heal Stomp, to your advantage.
----------.
Equipment: \_
Ctrl+F (F3): [req]
- No Armor (NA1): Self-explanatory.
- No Accessories (NA2): Self-explanatory. The lone exception in Accessories is AP altering rings with NO other modifiers.
This is, of course, if you need an extra AP boost.
- Only Weak Weapons (OWW): Equip Donald and Goofy with the weakest weapons possible to further ensure their "inactivity",
mostly Goofy given that he tends to damage enemies with his shield simply by running through them.
- Only Weak Keyblades (OWK): Equip Sora with the weakest Keyblades. Possible Keyblades to use include: Kingdom Key, Star
Seeker, Hidden Dragon, Follow the Wind, and Sweet Memories. However, if Sora's strength and magic are around the 100+ (or
at its max), then to make the challenge fair, equip Sora with Sweet Memories.
------------.
Drive Forms: \_
Ctrl+F (F3): [rdf]
- No Drive Forms (NDF): This is particularly self-explanatory; however, there is one instance where you can use a Form,
and this is only when short on MP. This tactic is best not used since by "Driving-Up" Sora replenishes his HP. But
if you are in an extremely, inescapably tight situation, where you're low on HP and/or MP, you could "Drive-Up",
but it must be Final Form and you need to revert ASAP. Again, this being a challenge with "No Healing" rules, this
is a tactic best avoided, but it could also be the exception if the situation REALLY deserves it.
NOTE: This rule obviously comes to play during the Cerberus Cup portion of the Hades Paradox Cup.
--------------.
Customization: \_
Ctrl+F (F3): [rcu]
- Sora Attack Party (SAP): Have Donald and Goofy customized to Sora Attack
- Red Arrow (RA): To further guarantee that Donald and Goofy don't attack, set all their Action abilities to Rare (red
arrow).
-----------.
Miscellany: \_
Ctrl+F (F3): [rmi]
- No Summons (NS): Self-explanatory.
- No Limits (NL): This means no use of Limits during the portions of the Cup where you can use your allies' Combination
Moves, as well as the use of Trinity Limit to defeat the Final Fantasy characters during Match 49.
- No Auto Abilities (NAA): Even though these aren't that appreciated, they become quite handy whenever in a strenuous
situation; however, they don't play a role in this challenge. This applies mostly to the Auto Form abilities.
=--------------------------=
=- Goals & Battle Report: -=
=--------------------------=
Ctrl+F (F3): [aim]
As you delve into the Paradox Challenge, there are various goals to meet that will hone your proficiency and iron your
place towards victory. These goals also would mean your induction to the Paradox Challenge Hall of Fame.
The following list numbers the goals for this challenge:
---------------------------------------.
Match Oriented Goals - Reaction Attack: \_
Ctrl+F (F3): [rat]
The Reaction Attack challenge consists of defeating a batch of enemies while using an offensive Reaction Command on an
entire set of enemies. There is a determined amount of enemies to defeat using these Reaction Commands, but one thing to properly
emphasize is that this particular part of the Paradox Cup Challenge is optional, though it serves to get orbs - not to mention
it could activate Double-Score Mode.
The following are Reaction Attack-based matches part of the Paradox Cup Challenge:
1) Match 2: Enemies simultaneously defeated using Hook Bat's Reaction Command, Bat Cry? 0/5
2) Match 3: Enemies simultaneously defeated using Rapid Thruster's Reaction Command, Speed Trap? 0/6
3) Match 6: Cannon Guns simultaneously defeated using Silver Rock's Reaction Command, Shift Shot? 0/3
4) Match 8: Soldiers simultaneously defeated using Silver Rock's Reaction Command, Shift Shot? 0/3
5) Match 8: Armored Knights, including Large Body, simultaneously defeated using the Rising Sun Reaction Command? 0/6
6) Match 11: Enemies simultaneously defeated using Rapid Thruster's Reaction Command, Speed Trap? 0/8
7) Match 33: Samurais simultaneously defeated using Duel Stance? 0/4
----------------------------------------.
Boss Match Oriented Goals - Time Attack: \_
Ctrl+F (F3): [tat]
Time Attack challenges consist of defeating certain bosses or beating certain mini-games in a pre-set amount of time -
sort of like some of Jiminy's Journal entries.
NOTE: Time Attack goals can be won with the combined use of magic spells, excluding Reflect.
The following are Time Attack-based matches part of the Paradox Cup Challenge:
1) Match 5: Volcanic Lord - 00secs/30secs
2) Match 10: Tifa & Yuffie - 00secs/45secs
3) Match 15: Blizzard Lord - 00secs/30secs
4) Match 20: Pete - 00secs/40secs
5) Match 25: Cloud & Tifa - 00secs/45secs
6) Match 30: Hades - 00secs/25secs
7) Match 40: Leon & Cloud - 00secs/55secs
8) Match 48: Cerberus - 0min:00secs/1min:20secs
9) Match 49: Leon, Yuffie, Cloud, & Tifa - 0min:00secs/1min:45secs
10) Match 50: Red Hades - 00secs/35secs
NOTE: These objectives require the use of a chronometer, which most watches have built-in.
-------------------------------------.
Cup Oriented Match Goals - Cup Rules: \_
Ctrl+F (F3): [com]
The Cup Rules challenge consists of completing certain matches while meeting a specific criterion, which are primordial
parts of the Hades Paradox Cup as-is.
The following are Cup Rules-based matches part of the Paradox Cup Challenge:
1) Damage Points left during the Titan Cup Rules: 000/500
2) Time remaining during the Cerberus Cup Rules: 00:00/10:00
--------------.
Battle Report: \_
Ctrl+F (F3): [bar]
Other than the goals, the Battle Report will give more in-depth details about how you handled the challenge. Some of these
objectives require the use of a chronometer, which most watches have built-in.
The Battle Report consists of the following:
1) Sora's Stats:
2) Keyblade:
3) Number of times Donald and Goofy were KO'd:
4) Max Combo:
5) Total Orb Score:
6) Remaining HP:
7) Most used Magic:
8) Times Final Form was used: 0/0
9) Orbs gained during Match 29?
10) Orbs gained during Match 45?
11) Healing Round (Match 47) needed?
12) Match 49 won with Reflect?
13) Hades Paradox Cup completed in 00min:00secs
Battle Report explanation:
1) Sora's Stats including strength, magic, defense, and AP.
2) Keyblade used throughout the challenge. Remember, it has to be one of the weakest.
3) Number of times Donald and Goofy were knocked-out during the challenge.
4) Total number of combos.
5) Total number of orbs collected.
6) Remaining HP percentage construe - from 10%-100%.
7) Magic spell you used the most throughout the challenge.
8) Times you used Final Form during the portions of the Hades Paradox Cup where it's available. Remember to read the NDF
rules.
9) Amount of orbs collected if you gambled with the Gamblers during Match 29. Use a calculator for this: simply take your
initial orb score before Match 29 begins, subtracting that amount with the one you'll have once the match concludes.
10) Amount of orbs collected during Match 45. Use a calculator for this: simply take your initial orb score before Match
45 begins, subtracting that amount with the one you'll have once the match concludes.
11) Did you use a Crescendo's Heal Stomp before concluding the match?
12) Did you use Reflect in order to defeat the Final Fantasy characters in Match 49?
13) How long did it take you to complete this challenge?
NOTE: You'll need a chronometer and a calculator for some of these requirements.
=--------------------=
=- Recommendations: -=
=--------------------=
Ctrl+F (F3): [rec]
The following are recommendations regarding Sora's Abilities and Magic with brief descriptions of their use. Remember,
they are simply that - you can make your own strategies to accommodate to the challenge.
----------.
Abilities: \_
Ctrl+F (F3): [abs]
Since this challenge is basically a survival battle, equipping all the abilities possible will help towards the end goal.
Basically, the best abilities are always the Support ones given that they always become more than an auxiliary method and
a necessity.
Recommended Abilities:
(Listed in the order they appear in the Abilities Menu.)
- Guard: Quite an underrated Ability by some members in the Kingdom Hearts II GameFAQs message board. Guard greatly helps
during various matches, mostly when confronting the Final Fantasy characters. Overall, Guard is a great ability to have equipped.
- Counterguard: Combined with Guard, Counterguard helps mostly during the Final Fantasy-based matches. It's a formidable
tactic to break their attacks, specifically Tifa's punches.
- High Jump: An essential ability to help you dodge and reach certain enemies.
- Quick Run: Essential to dodge on-ground attacks.
- Aerial Dodge: Like with Quick Run, but mostly for aerial circumstances.
- Glide: A formidable ability, not only to avoid damage and attacks, but also to stall enemies, mostly during the MP Charge
phase.
- Scan: This ability isn't a necessity, but it helps to keep track of how much to eliminating an enemy (it comes in handy
during Paradox Boss matches).
- Aerial Recovery: Helps to recover from attacks, helping you to maneuver and avoid upcoming ones. This ability works
best during Paradox Boss matches, specifically in Match 49. Aerial Recovery is really effective when combined with Glide.
- Combo and Air Combo Plus: Nothing more can be said that "plus" says. These abilities help to extend your combos
in order to activate Double-Score Mode.
- Combo Boost: Again, an essential ability to help your combo extensions.
- Air Combo Boost: Again, an essential ability to help your combo extensions, but primordially air-based.
- Reaction Boost: Not only does it help during certain activated Reaction Commands, but it also helps during Match 48
where you face Cerberus.
- Finishing Plus: Great for finishers - the name says it all.
- Magic Lock-On: Perfect extension for Magnega and Thundaga.
- Fire/Blizzard/Thunder Boost: You could have them all equipped or just the one you know you'll use more. Of the three,
Thunder Boost will prove the most beneficial, though you can never go wrong with Fire and Blizzard altogether.
- MP Rage: Equipping both will certainly help to maintain a healthy MP bar, mostly during Matches 35 and 45. Having Hidden
Dragon would even triple the MP recovering rate.
- MP Haste: An ability that serves its purpose well during tough matches by stalling enemies with Glide. MP Haste is definitely
a must to have equipped.
- Defender/Second Chance/Once More: These three will become an essentiality when Sora's HP is somewhat critical to critical.
Of course this doesn't mean he'll never fall, but will definitely aid you towards the end. Obviously it's preferable to never
reach a critical stage, but they will surely serve their purpose.
Overall you will need an amount of 70+ AP if you want to equip all of these abilities, or 60+ if you omit the Elemental
Boosts; I personally would at least equip Thunder Boost, though. The rest of the abilities are up to you and your fighting
style seeing as we all have personal styles, which will roundup the needed AP to at least a 100+ if you also equip the previous
abilities, and a 90+ if you exclude the Elemental Boosts.
Distribute AP wisely.
------.
Magic: \_
Ctrl+F (F3): [mag]
As noted in the Rules section, spells are part of the challenge and can be used accordingly, aside from Cure of course.
Customize the Shortcut Command as you see fit, and following your fighting style. I'd like to recommend a viable option, however:
[]: Firaga
X: Thundaga
O: Reflega
/\: Magnega
Firaga usually serves as a "ground control" spell; helping to disperse enemies that surround or are about to
encircle Sora, as well as it serves as a "shield" of sorts.
Thundaga is a spell you can blindly rely on, mostly when trying to activate Double-Score Mode; its shockwave radius is
a formidable addition when weak enemies abound.
Then we have Reflega, one spell that's totally unappreciated by many, which can be a lifesaver during this challenge at
10 MP per casting. Not only does it work by deflecting attacks or projectiles, but it also damages those attacking Sora once
the temporary shield fades away with a volley of charged bursts powered by the amount of damage directed at the temp barrier.
Reflect is an amazing way to dispose of Berserkers, and great against the Final Fantasy characters in Match 49.
And lastly there's Magnega which combined with Thundaga usually equals instant victory. Magnega is better saved for matches
with numerous enemies where you easily can active Double-Score Mode. Magnega is best used during matches where there are strong
enemies, like Living Bones and Morning Stars for example. However, one of the best uses for Magnega within this Cup comes
during Match 35 and 45.
This is of course a recommendation regarding the Shortcut, which is totally up to you, specifically the customized order.
Simply be sure to take full advantage of magic spells since this, not only covers more ground, but can confer higher orb punctuations.
=----------------------------------=
=- Paradoxical Challenge Rundown: -=
=----------------------------------=
Ctrl+F (F3): [pcr]
This section covers the Paradox Challenge as a whole, detailing each match with succinct strategies.
Goddess of Fate Cup Rules - Matches 1-10: Starting from Match 1-10 gathering orbs isn't all that important seeing as the enemies
are somewhat weak, though that still doesn't mean you shouldn't aim to get a good starting score.
Match 1: 3 Shadows & 3 Soldiers
This one is basically a straightforward match. However, activating one or two of the Soldiers' Cyclone Reaction Command should
be a nice startup towards your orb score.
Match 2: 2 Hook Bats & 4 Drill Moles
This one is basically a straightforward match, almost similar to the first.
Reaction Attack Goal: To complete the goal stay still and let the enemies approach Sora. Once they're close enough,
start to move amongst them, parrying any attack if necessary, which will sometimes activate the Hook Bat's Reaction Command.
Once Bat Cry is prompted, rapidly use it against all enemies maintaining Sora within their reach so that you can defeat all
simultaneously.
Match 3: 2 Surveillance Robots & 4 Rapid Thrusters
This one is basically a straightforward match.
Reaction Attack Goal: To complete the goal approach the enemies and stay under the Rapid Thrusters, avoiding any possible
attack from the Surveillance Robots. This goal can be rather tricky since you could accidentally activate and perform Snag/Sparkle
Ray. If you accidentally grab a Surveillance Robot, don't follow the Reaction Command and continue to stall until a Rapid
Thruster's Speed Trap is prompted.
Match 4: 2 Creeper Plants & 5 Rabid Dogs
Don't bash the enemies head-on as soon as the battle starts; instead Quick Run or jump over the Rabid Dogs and strike once
a Creeper Plant to activate the Root Ravager Reaction Command for a good 260+ orb points. Otherwise, you could also start
the battle casting Magnega for a good amount of orbs. Activating Double-Score Mode would be extremely convenient, and fluky.
Match 5: (Boss) Volcanic Lord & 2 Soldiers (2)
Even though you're facing a boss, the battle is pretty much as straightforward as the previous matches and similar to the
encounter with Volcanic Lord in Agrabah.
Commence your turn by approaching the Volcanic Lord to use the Firagun Reaction Command in order to daze and properly attack
him. You could easily cut the Volcanic Lord's movements by bashing onto him with your attacks; but be careful when he raises
his staff not to get hit or it'll send Sora flying - here's where Aerial Recovery comes in handy. Two Soldiers will accompany
the fire-based Heartless, and two more will spawn each time the other two are defeated, which you should simply ignore.
Time Attack Goal: The required time to beat is 30 seconds or less, which is quite an easy time to beat if you simply
button-smash with good precision. Avoid the Soldiers and maintain Sora airborne. If you combine attacks with Blizzard spells
you should beat Volcanic Lord in less than 30 seconds.
REMINDER: Reflega won't count towards the Time Attack goals, so play it fair and don't cheat - be honest with yourself.
The strategies provided will ensure you victory without the need of said spell.
Match 6: 3 Cannon Guns & 3 Silver Rocks
Cannon Guns and Silver Rocks sometimes are tricky Heartless, more when combined, but they can be easily disposed of.
Reaction Attack Goal: As soon as the match starts move forward, never locking-on to either enemy. When the Shift Shot
Reaction Command prompts, lock-on to the Cannon Gun in the middle and use Shift Shot. If you do it right, you'll take out
the three Cannon Guns at the same time.
Match 7: 3 Icy Cubes & 4 Shadows -> 8 Minute Bombs
This one is a straightforward match, similar to prior matches.
When you defeat the Icy Cubes and Shadows, maintain Sora in the center of the arena and let the Minute Bombs approach him.
These particular Heartless are a great way to collect orbs if you activate their Self-Destruct attack, although using Magnega
or Reflega on them gives as much, if not more orbs. Use Fire magic to light the fuse on their heads.
Match 8: 2 Silver Rocks & 3 Soldiers -> 5 Armored Knights -> 1 Large Body
Straightforward match: nothing out of the ordinary.
Reaction Attack Goal I: As soon as the battle starts, lock-on to the Soldier in the middle while approaching it –
the other Soldiers will home in to Sora while the Silver Rocks prepare to teleport. As soon as the Shift Shot Reaction Command
activates, use it against the Soldier you've lock-on. If done right, you will take out the whole Soldiers, and even the other
Silver Rock.
Reaction Attack Goal II: Once the Armored Knights spawn, lock-on to any of them and stall by running around them. As
soon as the Rising Sun Reaction Command appears, use it and try to line up with the Armored Knight to take them out in one
to two strikes so that you can attack the Large Body that will appear once the Armored Knights are defeated. If you do this
right, you should dispose of the Armored Knights and the Large Body with only two to three Rising Sun strikes, acquiring a
good orb score at the same time.
Match 9: 1 Samurai & 4 Creepers
First match involving Nobodies. Not a difficult match, however.
Run towards the Samurai, ignoring the Creepers, and parry its sword slash to activate Duel Stance. Defeating Samurais with
the use of Duel Stance confers more orbs, though defeating the entire batch of enemies with Duel Stance will give even more.
It's rather tricky to line up the Creepers with the Samurai, but its possible to do. You can also use Thundaga for this; it's
all up to you.
Match 10: (Boss) Tifa & Yuffie
Surprisingly, this match is not that hard, though Yuffie does become a nuisance. Make Tifa follow you and prepare to parry
her punch following with Counterguard - this will cancel her move and leave her open for attack. Sometimes it will be a bit
tricky to unleash a finisher on Tifa since Yuffie tends to teleport and slash away, though sometimes she tends to teleport
in exactly when Counterguard is being performed giving you enough time to release one or two finishers.
Time Attack Goal: To beat the 45 seconds requirement, simply stick to your common strategy: let Tifa follow you. A
good tactic after parrying Tifa's attack is to Counterguard and follow with a Blizzard spell, following that with a finisher
since you can unleash one after using a magic spell. Explosion usually comes out first, which is always the best since it
can hit both, Yuffie and Tifa.
REMINDER: Reflega won't count towards the Time Attack goals, so play it fair and don't cheat - be honest with yourself.
The strategies provided will ensure you victory without the need of said spell.
Titan Cup Rules - Matches 11-20: After the Goddess of Fate portion of the Paradox Challenge, be cautious and very defensive
during the Titan Cup portion to keep the damage points as high as possible.
Match 11: 3 Aeroplanes & 5 Rapid Thrusters
Straightforward match. As soon as the match begins jump and attack the Rapid Thrusters, trying to balance Sora so that you
can take the Aeroplanes as he swiftly spins around.
Reaction Attack Goal: Completing this goal is really easy. Simply approach the Rapid Thrusters and double jump and
slowly descend (by pressing Square). Not only does this protect Sora against the Rapid Thrusters' Beak Rush, but it also does
against Aeroplanes' Machinegun Strafe attack - of course, if you maintain Sora airborne. Keep double jumping and slowly descending
until Speed Trap is prompted; use it following it with Aero Blade. If done right, you will simultaneously defeat all enemies,
and collect a good orb score.
Match 12: 1 Magnum Loader, 2 Air Pirates & 4 Minute Bombs
Straightforward match. You could easily follow some Reaction Commands in this match to get more orbs, but it's almost preferable
to just simply defeat them. Magnega or Thundaga work well here.
Match 13: 2 Drill Moles & 3 Luna Bandits
Straightforward match; don't bother too long.
Match 14: 2 Armored Knights, 2 Lancer Soldiers & 2 Tornado Steps
This one is a special match - Lance Soldiers are a great way to gather orbs and usually an easy Double-Score Mode activator.
Strike a Lance Soldier once so that they begin their Reckless Lancing attack to activate Reckless Lance and defeat the Armored
Knights and Tornado Steps with it; most likely you'll activate Double-Score Mode.
Match 15: (Boss) Blizzard Lord
This match is fairly similar to Match 5 where you confronted Volcanic Lord.
Approach Blizzard Lord and use Blizzagun to daze and attack him. Keep attacking him, but be careful not to get hit with his
staff. This is quite as straightforward as Match 5 was.
Time Attack Goal: After using Blizzagun, Aerial Dodge and Glide straight at Blizzard Lord and start a combo using Firaga
continuing with attacks. Keep using Firaga at the end of each attack and more than likely you'll hinder Blizzard Lord's movements.
REMINDER: Reflega won't count towards the Time Attack goals, so play it fair and don't cheat - be honest with yourself.
The strategies provided will ensure you victory without the need of said spell.
Match 16: 2 Wight Knights & 4 Soldiers
Match 16 is as straightforward as the rest, with a few instances where you could use Reaction Commands to your advantage.
Magnega or Thundaga remain as a great way to end the battle quickly.
Match 17: 3 Neoshadows & 4 Strafers -> 4 Aerial Knockers
Straightforward match. This particular match is quite versatile; you can begin the match by casting Magnega or Thundaga, as
well as you can simply win it with a string of hits.
Match 18: 2 Air Pirates & 2 Luna Bandits -> 3 Creeper Plants & 3 Wight Knights
Straightforward match. Air Pirates and Luna Bandits don't make for a strong pair, so you can easily dispose of them. The Creeper
Plant/Wight Knight combination is quite interesting, though. Ignore the mummies and head towards any of the plants - strike
it once to activate Root Ravager; it will confer enough orbs. You could also cast Magnega for the same effect.
Match 19: 1 Dragoon, 2 Creepers & 2 Dusks
Another bout with some Nobodies, though this isn't as intimidating as coming Nobody-based matches. Simply cast Thundaga or
attack them head-on.
Match 20: (Boss) Pete
Pete's match is relatively easy. You can use this particular match to recharge MP so that you have a full bar for later matches.
If the MP bar is pink from the start, Glide around the arena waiting for it to replenish, and if it's around 25% to 15% full,
empty it by continuously casting Reflega while airborne or out of Pete's reach and Glide around the arena until it refills.
Admittedly, this match can basically be won by button-smashing, but don't take it too seriously. Slide Dashing is the best
way to approach Pete, so try to be at a good distance from him to Slide Dash. Another possible way is to land a strike while
jumping towards Pete and connect four Horizontal Slashes followed by the air finisher and the successive blow after the finisher,
which will bat Pete giving Sora good distance for a Slide Dash. Even though Pete is relatively as easy as the Elemental Lords,
be cautious of his tantrum and explosive attacks.
Time Attack Goal: The 40 seconds requirement is more than enough to say the least; but if you began the match to refill
your MP bar, be sure NOT to damage Pete while casting Reflega or you'll annul the Time Attack Goal (basically you’ll
just initiate it).
To complete the 40 seconds Time Attack Goal, jump towards Pete and attack him, followed by a combo making sure to bat Pete
after the finisher. Since the last aerial strike sends Pete flying, it will give enough distance to perform Sora's Slide Dash,
which can be followed by a combo. After the long combo strike, Pete will cast Aura, so just stand still and wait for the shield
to go down to attack. Repeat the combo assault and you'll beat him under 40 seconds or less for sure.
REMINDER: Reflega won't count towards the Time Attack goals, so play it fair and don't cheat - be honest with yourself.
The strategies provided will ensure you victory without the need of said spell.
Pain & Panic Cup Rules - Matches 21-30: During this portion of the challenge Donald and Goofy rejoin with Sora, which practically
is more of an impediment than a benefit. Magnega and Thundaga continue to be a great way to defeat enemies, as well for gathering
orbs.
Match 21: 3 Gargoyle Knights & 4 Armored Knights
Straightforward match. Maintain a defensive post with the Gargoyle Heartless, as they tend to be very vicious with their spinning
attacks. Parrying the Gargoyles' attack will activate the Release Reaction Command; so try to do so to get more orbs from
them.
Match 22: 1 Aeroplane, 2 Fortunetellers & 2 Trick Ghosts
Straightforward match. Use Magnega or Thundaga to end the battle quickly.
Match 23: 2 Creeper Plants, 2 Shamans & 2 Soldiers
Like with other matches involving Creeper Plants, you have two options: striking a Creeper Plant to activate the Root Ravager
Reaction Command or Magnega. Both techniques confer enough orbs, so choose whichever you prefer.
Match 24: 3 Bulky Vendors
This is a special match, so put a lock-on on a Bulky Vendor as soon as it begins and wait for their HP to deplete, just like
you would normally do. However, sometimes it could be hard to defeat all three during their Prime Capsule phase, so it's preferable
to beat one during the Limited Capsule phase. Still, have in mind that it is possible to defeat them during the Prime Capsule
phase, where you'll have to emphasize on using Quick Run or trying to corner them.
Match 25: (Boss) Cloud & Tifa
This time around Tifa's with his hubby, which means you should concentrate on defensive maneuvers instead of being all-out
offensive.
The same strategy you used for Tifa during Match 10 applies for this match, just that this time around you have to watch out
for Cloud's hectic sword lunges. Start the battle by retreating to the far back so that both Cloud and Tifa follow you; prepare
to parry any of the forthcoming attacks (most likely Tifa's), and Counterguard followed by a combo. Defeating Tifa first should
be your goal since she's one annoying force. Cloud is a heavy hitter, but can easily be defeated if you parry and dodge his
attacks - watch for his Warrior's Spirit attack, though.
Time Attack Goal: To defeat Cloud and Tifa under 45 seconds, you can easily combine your attacks with Blizzard spells
since they are both vulnerable* to it. Also, one quick way is to remain still as soon as the match starts, parry Cloud's attack
and Counterguard to hit both him and Tifa, following with a combo on Tifa. After defeating her, go for Cloud keeping a lookout
on his attacks. Parrying and countering is the best way to complete the 45 seconds goal, if not the quickest.
* Vulnerable as in a technical term.
REMINDER: Reflega won't count towards the Time Attack goals, so play it fair and don't cheat - be honest with yourself.
The strategies provided will ensure you victory without the need of said spell.
Match 26: 1 Neoshadow, 2 Bolt Towers & Hammer Heads
This is a straightforward match, so don't waste much time in it unless you're low on MP.
Match 27: 2 Gargoyle Warriors & 8 Rabid Dogs -> 4 Nightwalkers
A good amount of orbs can be obtained during this match, so begin by casting Magnega and rapidly defeating the Gargoyles since
they probably won’t be instantly KO'd with the Magnet spell. If done fast and right, Magnega will still remain during
the second Heartless batch of the Nightwalkers.
Match 28: 2 Bookmasters & 2 Emerald Blues -> 4 Shamans -> 2 Emerald Blues & 4 Silver Rocks
This match could be complicated, so be defensive tactics combined with offensive maneuvers.
The match begins with 2 Bookmasters and Emerald Blues. The latter will go towards Sora as soon as the battle begins, so take
them out fast with normal attacks so that they don’t begin their tornado attack. Bookmasters will surely cast fireballs,
so deflect them or jump towards them and take them out. Be careful with these two because they tend to move away whenever
you make an approach - using Quick Run works well when cornered by these two, mostly if the Emerald Blues are still around.
The second batch, the Shamans, is quite annoying. The best way to dispose of these is by retreating and letting them follow
you and once they're relatively close to each other, cast Magnega. You can also take them out using normal attacks, but it'll
be a bit fiddly; but it isn't impossible. Shamans are very imposing in the Paradox matches contrary to their Pride Lands counterparts.
The third and final batch of Heartless is completely different to the prior two and can be easily defeated. Simply use the
Shift Shot Reaction Command against the Emerald Blues, as well as the other Silver Rocks. Not only is this an easy way to
defeat enemies, but also great for gathering orbs.
Match 29: 2 Gamblers & 2 Snipers
This is a special match comprised of gambling fun.
In this match you can easily win orbs by gambling with the Gamblers, though it is preferable to defeat the Snipers first.
Activating Double-Score Mode is particularly beneficial; so try to use Warp Snipe against both Snipers. Don't get frustrated
if you don't activate it though, you can easily get around 60 orbs by continuously playing each of the Gamblers' game. The
procedure for this is the same you would follow during standard fights against a Gambler.
Battle Report Objective: Use a calculator for this: simply take your initial orb score before Match 29 begins, subtracting
that amount with the one you'll have once the match concludes.
NOTE: It is possible to activate Double-Score Mode while gambling with a Gambler, but it is EXTREMELY rare for it to
happen.
Match 30: (Boss) Hades
Hades is still the same, just a bit more of HP. Start the match by parrying his Firaga Ball attack progressing towards him
in order to attack him. Unleash a combo and put pressure on Hades by attacking him again before he disappears. Be careful
when Hades creates a firewall, as well as his fire-based sweeps, and continue to apply pressure when possible. Aerial combos
are the best way to defeat Hades.
Time Attack Goal: The 25 seconds goal is tremendously easy. Simply perform aerial assaults and apply pressure so that
you can maintain Sora align with Hades.
REMINDER: Reflega won't count towards the Time Attack goals, so play it fair and don't cheat - be honest with yourself.
The strategies provided will ensure you victory without the need of said spell.
Cerberus Cup Rules – Matches 31-40: Sora fights alone during this part of the tournament with his Drive Forms available.
This particular subdivision is mostly comprised of Nobodies, which sets a rather thorny side of offensiveness, mostly due
to its 10-minute time limit; so be sure to use Guard and Reflect whenever needed.
Match 31: 1 Berserker, 2 Creepers & 2 Samurais
The first Nobody batch, and quite a strong startup.
The Berserker will jump towards Sora as soon as the match begins, so retreat to safety or simply use Reflect. Using Magnega
and Thundaga also work against these Nobodies, mostly with Magic Lock-On equipped.
Match 32: 3 Dancers & 3 Water Notes
During this round you'll have to destroy three water notes, reminiscing Demyx's own. When the battle begins, remain still
letting the three Dancers approach Sora and as soon as they're within considerable reach, use the Water Dance Reaction Command
and you'll be able to take out both, the notes and the Dancers. Not only will you save time, but you will also receive a good
orb score. However, you could defeat each by conventional means and it will work equally, if not better.
Match 33: 4 Samurais
This particular match could turn ugly if prolonged, as well as it is one of the few matches that give few orbs.
Start the match by casting Magnega followed by Thundaga and you will take the Samurais with ease.
Reaction Attack Goal: To accomplish this goal, simply cast Magnega and align Sora with the Samurais, and once they're
released parry any of their attacks to activate Duel Stance. Now, sometimes you won't defeat all four in a single strike,
but you'll probably defeat three simultaneously. Defeating all four Samurais with a single Duel Stance can be achieved by
keeping Sora idle in the middle of the arena after casting Magnega, and most likely they'll creep together to him.
Match 34: 2 Sorcerers
This match may seem easy, but if you're one of those gamers with rusty evasive skills it'll probably prove its difficulty.
Start the match by either jumping and gliding towards the Sorcerers followed by an aerial assault or by retreating to dodge
the cubes in order to cast Magnega on them. The latter is optional and a thing of tastes, but usually the Sorcerers counterattack
when casting Magnega against them by smacking Sora with the cubes in a whip-like pattern.
Match 35: Swarm of Rapid Thrusters
During this match all you need to do is cast Magnega, nothing else. Don't lock-on to a Rapid Thruster and don't even move;
Magnega usually lasts for about 6 seconds; so recast it after 5 seconds have passed.
Match 36: 3 Berserkers
Hit and run is how best this match can be described; however, Magnega and Thundaga continue to be an undeniable advantage.
Start the match by retreating to the far back of the arena from where Sora is, and cast Magnega from a safe distance; you
can then either rush towards the Berserkers and bash them with your Keyblade or use Thundaga on them.
Match 37: 2 Snipers & 3 Assassins -> 4 Dragoons
If you're MP Bar is around 15% to 10% full, defeat the Snipers and cast Reflega out of the Assassins' reach to recharge your
MP. Afterwards, defeat the Assassins with normal attacks, trying to keep your combos clean without missing to try and activate
Double-Score Mode. Now, a good tactic is to lure the Assassins to the center of the arena so that once they're defeated you
can attack the Dragoons that will follow in a single combo session. Still, if you miss to do this, don't falter, a Thundaga
should do the trick, as well as Learn/Jump.
Match 38: 6 Dusks -> 4 Dancers -> 5 Samurais -> 4 Gamblers -> 1 Sorcerer
This match's a full-on Nobody Mêlée, so be ready to be offensive and defensive.
The Dusk batch is easily handled, not only because they're predictable, but also because you can use the Reversal Reaction
Command. Once the Dancers appear, take them out one by one, being cautious of their Swing Toss move. Samurais will follow
afterwards, so alternate attacks with evasive moves to properly defeat them. Then will come the Gamblers, and even though
you can gamble with them, it's best to avoid that to not waste time; however, you can gamble with the four in order to stun
them. And finally, you'll encounter a Sorcerer, which you can defeat by running counterclockwise waiting for an opening.
All in all, maintain a defensive post whenever a new Nobody appears and remain in the center of the arena to lure them.
Match 39: 4 Dragoons
Ending the Nobody-based matches, try to defeat these Dragoons using their Learn/Jump Reaction Command; deflecting their attacks
usually activates it.
As usual, you can rely on Magnega and Thundaga to win this round, though.
Match 40: (Boss) Leon & Cloud
Continuing the Final Fantasy oriented matches, this one consists of Leon and Cloud - two that can really end your winning
streak if you're not careful.
As the match begins, first thing you have to do is retreat to the far back of the arena and be prepared to bounce Leon's fireball
back at Cloud. Maintain distance afterwards and try having both Leon and Cloud follow Sora so that you can have a clean shot
at both by parrying Cloud’s Sonic Rave. Parrying their attacks is the best way to defeat them since by using Counterguard
you can knock both Leon and Cloud and have an opening for a combo that will most likely hit both if you can pull Explosion.
Of course, both Leon and Cloud have an elemental weakness, which is Blizzard and Fire respectively so you can take advantage
of that, or you can use Reflect on them.
Time Attack Goal: Defeating Leon and Cloud in less than 55 seconds could be a tough trick to pull off, but it is possible.
Jump and glide towards the two and make sure to land in the middle a couple of feet away; if done right, Leon won't start
the match casting Firaga, but actually slashing through while Cloud does his Sonic Rave move. Parry whichever attack seems
the closer and perform Counterguard rapidly so that it knocks Leon and Cloud, follow it up with a combo making sure to put
a lock-on to the one Sora hits first. Keep playing the defensive but offensive role and you will take Leon and Cloud pretty
fast.
Now, if you happen to jump and glide towards the duo and Leon casts Firaga still, don’t worry about it. Simply parry
the fireball, jump out of harms way and prepare to parry any incoming sword thrusts.
As a final note, sometimes Leon will taunt Sora by saying, "I'm better, give it up..." Don't waste this opportunity to attack
him full on.
REMINDER: Reflega won't count towards the Time Attack goals, so play it fair and don't cheat - be honest with yourself.
The strategies provided will ensure you victory without the need of said spell.
Hades Cup Rules - Matches 41-50: This is the last stretch of the challenge, the main "juice" in other words. Sora's on his
own, however, which means no allies, Summons, and Drives. Here Magic becomes your best ally, but try not to waste your MP
unnecessarily.
Match 41: 2 Graveyards & 2 Toy Boxes
Start this match casting Magnega, which will most likely destroy all the candleholders in the arena and leave the Graveyards
weak enough. Unfortunately, Graveyards can't be defeated with magic when they reach 1 HP, so make haste and unleash your best
aerial assault.
This match could turn ugly, but you have space to move in case you're cornered.
Match 42: 1 Living Bone & 2 Fortunetellers
Once again, cast Magnega as soon as the match begins. This will most likely destroy the candleholders, but also gives you
enough time to rush to defeat the Living Bone and Fortunetellers.
Match 43: 2 Large Bodies & 2 Morning Stars
This may seem like an intimidating match, but it isn't actually easy.
Like with the last three matches, cast Magnega and take out the 2 Morning Stars. After that, empty your entire MP Bar and
glide around until it refills; try to destroy each candleholder with Thundaga. By doing this you'll have enough MP for Match
45. Then, after your MP is refilled, defeat the Large Bodies and proceed to Match 44.
Match 44: 3 Living Bones
As soon as Match 43 ends, press L1 and whichever Shortcut you have for Magnega. In this particular match, Living Bones are
aggressively vicious, almost always – if not always - performing their Spinning Tail attack when the match begins, which
can be a real threat if your HP is under 30%. After casting Magnega, don't cast another magic spell, instead rush towards
the Living Bones and quickly take them out.
Match 45: 1000 Heartless Battle – Armored Knights & Surveillance Robots
One of the greatest moments of the game has its very own niche in the Hades Paradox Cup. Shame it's only a minute long...
During this match the best way to get orbs is by wasting Magnega and using the Surveillance Robot's Snag/Sparkle Ray Reaction
Command. Combine the two: cast one Magnega spell and run around so that enemies approach Sora and end up sucked by the magnet,
then try to grab a Surveillance Robot to take as many Armored Knights as possible.
Battle Report Objective: Use a calculator for this: simply take your initial orb score before Match 45 begins, subtracting
that amount with the one you'll have once the match concludes.
NOTE: It is actually possible to destroy all the Heartless before the minute expires; however, this is mostly possible
with Magnega and a couple of Ethers. This isn't the case, but have in mind that you can in any other occasion.
Match 46: 1 Devastator & 2 Hot Rods
This is another one of those matches where you can easily end up cornered, and two Hot Rods can actually intimidate.
Since your MP Bar will be in its recharge stage after the last match, start by jumping towards the Devastator and unleash
an aerial attack, which most likely by the end of it (Aerial Finish) will take the two Hot Rods. If not, then simply jump
away and avoid their Flip-Dash move, which could be used to your advantage by making them destroy the candleholders. Guard
and Counterguard work amazingly when Hot Rods go berserk, so take note of that.
If you're not too fond of being suicidal and taking this batch of Heartless head-on, then glide around until you're MP is
refilled and use Thundaga on them.
Match 47: 1 Bulky Vendor -> 1 Living Bone & 2 Lance Soldiers -> 2 Assault Riders & 2 Emerald Blues -> 3 Morning Stars &
5 Crescendos
You have finally reached the "Healing Round", but don't get too excited; you need to reach the fourth and final enemy set
in order for Sora to get healed.
While the Bulky Vendor's HP depletes, your MP Bar will probably be in its recharge phase, and most likely it will completely
during its last life bar.
After defeating the Bulky Vendor, and with a recharged MP Bar, cast Magnega to ensnare the Living Bone and Lance Soldiers.
But don't defeat them; take advantage of the Lance Soldiers' Reckless Lance Reaction Command to get more orbs.
Following the last batch, you have two options: recast Magnega or retreat to take each enemy one by one. If you recast Magnega,
you will risk Sora's chance of getting healed by a Crescendo if you defeat the enemies too soon. In this case, wait 2 to 3
seconds prior casting to secure the last enemy set. Now, if you decide to take them one by one, then move away the Assault
Riders' reach and take the Emerald Blues out, then take each Assault Rider with Thundagas or a combo.
Once you defeat the last batch, in comes the fourth enemy set: Morning Stars and Crescendos. It will be a bit tricky, but
simply retreat and let the Morning Stars follow Sora in order to take them one by one – don't protract or the Crescendos'll
heal them. Most likely Sora's HP will be under 15% by now, so be extra defensive and use Reflega. Getting as far away from
the Crescendos as possible is highly recommendable so that Reflega doesn't hit any. Afterwards, you have all the Crescendos
for yourself, so use the Heal Stomp Reaction Command and get as many orbs from them as possible.
Match 48: (Boss) Cerberus
Contrary to the Cerberus Cup match with, well, Cerberus, you can't use Drive Forms in this one; though that's not entirely
necessary. Also, this bout with Cerberus is relatively similar to the first one, except you're alone.
Time Attack Goal: Button-smashing comes in handy in this particular match, but it won't always work with precision
if you don't bother to dodge and watch out Sora's HP. So, as soon as the match begins, jump towards Cerberus and land a few
strikes, then avoid its Jumping Crash attack and its consecutive shockwave. Apply pressure to Cerberus by unleashing aerial
attacks, and use Retaliating Slash if he connects a Bite. Dark Breath isn't much of a threat even though he spews a lot of
it, but it's wise to dodge a few whenever they seem to close. Wasting Thundaga works mighty well from a distance, too.
For a dog its size, Cerberus is pretty much an easy target.
TIP: Let Cerberus capture Sora with his Trap move so that you can take full advantage of the Evade/Jump!/Dog Paddle
Reaction Command sequence.
REMINDER: Reflega won’t count towards the Time Attack goals, so play it fair and don’t cheat – be
honest with yourself. The strategies provided will ensure you victory without the need of said spell.
Match 49: (Boss) Yuffie, Cloud, Tifa, & Leon
I call this match the Final Fantasy Mêlée, the one you probably were left agape during your first play-through.
This could be considered an overawing match for the fact that you're facing four seemingly tough characters, and the fact
that their from the Final Fantasy series adds more intimidation; but, this match is not as hard as you could or might've envisioned.
Basically all it needs is complete attention, defensive strategies, and a third eye if you're low on HP.
Begin the match by Quick Running to the far back of the arena, putting a lock-on to either Cloud or Tifa to bounce Leon's
Firaga; it's a better tactic to bounce it back at Cloud to regress his footing while he prepares to Sonic Rave. Be ready to
parry whichever attack comes first, though most of the time it'll be from Cloud or Tifa, and Counterguard rapidly to swiftly
deliver a combo. Sometimes Sora gets cornered before he can actually unleash a finisher thanks to Leon or Yuffie, but most
of the time, due to the circumstances Sora’s in, Explosion comes out and hits everyone. Afterwards it's wise to jump
and get away and let them approach Sora and repeat the Guard/Counterguard strategy, following with a combo of course. Blizzaga
continues to be a great way to single-handedly take Cloud, Leon, and Tifa out.
Now, each attack is easily readable when it comes to counterattacking, but Yuffie's sometimes proves to be bothersome. If
that's the case, allow her to mope around and wait for her charged-up shuriken attack, and once it ends you'll have an excellent
opening for a combo. Usually Yuffie's the last one standing of the Final Fantasy quartet.
The match seems overwhelming, but in truth it isn't, though it could be the case if you prefer to be more on the offensive
and aggressive side than the defensive and cautious one.
Time Attack Goal: For this goal there's more than enough time, so try to make most of it.
To finish this fight fast, parry Cloud's Sonic Rave as soon as the match begins and use Counterguard but two seconds in delay,
which will more than likely hit all at once. Follow that with a combo on Tifa and try to take her out fast. Jump and glide
away, a couple of feet away from Sora's original post. Take out Cloud next, then Leon ending with Yuffie; of course, bouncing
Leon's Firaga is still a great way to take away HP from Cloud and Tifa when possible, so use that to your advantage. Blizzaga
also works its magic, so use it if needed.
REMINDER: Reflega won't count towards the Time Attack goals, so play it fair and don't cheat - be honest with yourself.
The strategies provided will ensure you victory without the need of said spell.
Match 50: (Boss) Red Hades
Well, you've made it to the last round of the Hades Paradox Cup; most importantly you have managed to survive this challenge.
Now, you just came from a match where you had to single-handedly defeat not two, but four opponents at once, so defeating
Hades – again – shouldn't be that hard.
This match with Hades resembles the last brawl with him during the second visit to Olympus Coliseum, where you'll have Hercules
as an ally.
When the match begins, knock an Aura Sphere at Hades and rush towards him to unleash an aerial combo. Try to keep Sora aligned
with Hades so that once the combo finishes you can have an opening for another aerial combo. When he disappears, stand still
and slowly rotate the camera until he reappears; put a lock-on and rush towards him, delivering an aerial assault. Applying
pressure to Hades continues to be the best way to defeat him, mostly while Sora's airborne. Be cautious of his attacks, mostly
his Fire Wall where he engulfs himself with his red flames.
Overall, Hades shouldn't be a problem, not even if Sora's HP is under 10%.
Time Attack Goal: The 35 seconds goal is tremendously easy. Knock an Aura Sphere at Hades as soon as the match begins,
following with aerial assaults and applying pressure so that you can maintain Sora aligned with Hades. Be careful with his
attacks, and try to have the camera aligned so that you can follow him when he disappears and reappears.
REMINDER: Reflega won't count towards the Time Attack goals, so play it fair and don't cheat - be honest with yourself.
The strategies provided will ensure you victory without the need of said spell.
=----------------=
=- Report Card: -=
=----------------=
Ctrl+F (F3): [rca]
Congratulations! You've successfully completed and survived the Paradox Challenge, proving your strength and resourcefulness.
Now, take your time to fill your goals and battle report, and send it to my email, zekeunbound18@yahoo.com.
Your report could be inducted in a special 'Hall of Fame' page here in the site. Remember to fill your report card in
the order provided in the Goals & Battle Report section for a better analysis.
To avoid scrolling up to the Goals & Battle Report section, hit Ctrl+F and copy and paste this tag, Ctrl+F (F3): [aim],
to quickly access it.
=------------=
=- Credits: -=
=------------=
Ctrl+F (F3): [crd]
Not many people to credit for this particular guide, outside of Disney, Buena Vista Games, Square Enix, and Tetsuya Nomura
for concocting this great game; and you, of course, for reading and taking part of this challenge.
=----------------=
=- Final Words: -=
=----------------=
Ctrl+F (F3): [fwd]
This concludes this challenge guide, brought to you by yours truly, PsychoZeke. If you would like to host this guide in your
site, all you have to do is send me an email. This is the first and final version of this guide, but it is still open for
changes, editing and/or supplementation.
All reports concerning the challenge can be sent to my email address or posted in the Q&A Page.
Email: zekeunbound18@yahoo.com
Thanks for reading.
Copyright (©) 2006 Ezekiel Lonewalker (PsychoZeke)
|
